Rpi – Cheap Power Meter
First of all you need some parts
1. A Raspberry Pi with an SD-card and power adaptor, which can be purchased from Farnell (Delivery 1-2 days). Optional: You can also buy a WiFi dongle and a shell with it.

2. If you don’t want to solder directly on the Raspberry Pi’s GPIO interface, I would recommend buying some Female-to-Female Jumper Wires.

3. 10k Resistor
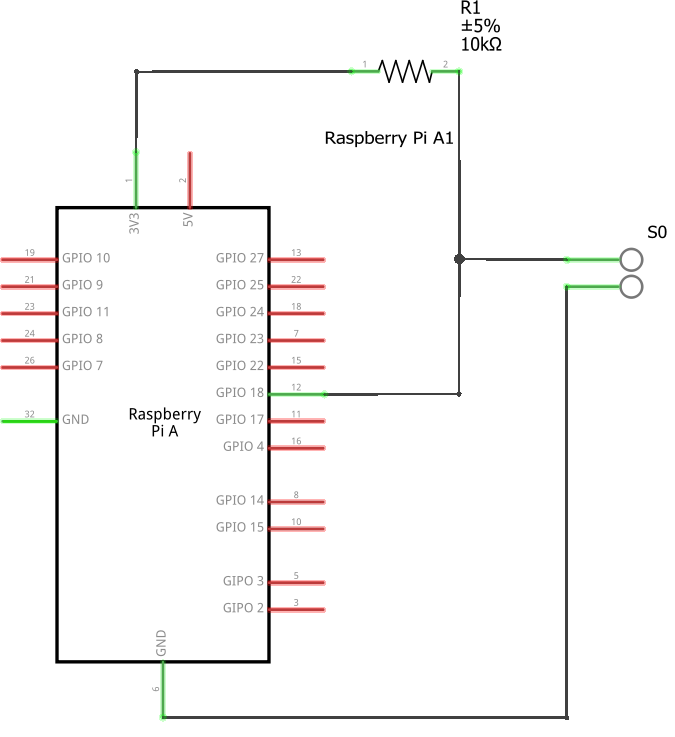
Connect a jumper wire from the 3.3 VDC power (P1, see below) on the Raspberry Pi and the other end to the resistor.
- Connect a jumper wire to the other leg on the resistor and to the plus (+) side of the S0 connector.
- Connect a jumper wire from the same (+ side) of the S0 connector to the GPIO (P18) on the Raspberry Pi.
- Connect a jumper wire from the minus (-) side of the S0 connector to the Ground (P6) on the Raspberry Pi.

Before you power on the Raspberry Pi, check everything is connected in the right way, otherwise you might damage your Pi.
4. Connect the Raspberry Pi to your local network with a wireless USB dongle or simply with a network cable.
That was the hardware part, now it’s time for a cuppa!
The software!
1. Download latest Rasbian Lite image from here.
1.1 Copy the image to a SD card.
1.2 Make an empty file with no extension called ssh, put in the root folder of your sd card, this will enable SSH from first boot.
2. When the operating system is installed into the SD-card, put it in the Raspberry Pi.
SSH into the Pi, using the IP (get the IP from your router). Default username/password is “pi/raspberry”
Run
sudo raspi-config
to change timezone, locale, password and expand the filesystem.
Then log in to your Raspberry Pi through SSH and install the required modules and applications:
sudo apt-get update
sudo apt-get install python-dev
sudo apt-get install python-setuptools
sudo easy_install rpi.gpio
sudo apt-get install mysql-server
sudo apt-get install python-mysqldb
sudo apt-get install phpmyadmin
sudo apt-get install apache2
When installing mysql-server, you are asked to type a password, make sure it’s long and mixed. Write it down, as you’ll need it when installing phpmyadmin!
When installing phpmyadmin, you are asked to type the password you chose when installing mysql-server, next you are prompted to type a new password for root user to use when logging into phpmyadmin.
3. Then download and install the CheapPowerMeter application
wget https://www.rakett.dk/wp-content/uploads/2016/12/cpm.zip
unzip cpm.zip
sudo cp cpm/html/* /var/www/html -R
sudo rm /var/www/html/index.html
4. Now you have to set up the database
Open a web-browser and go to your Raspberry Pi’s phpmyadmin interface (http://<the ip address>/phpmyadmin)
5. Run the following SQL sentences to add a database, table and a user.
Remember to change “yourpasswordhere” to your own password.
CREATE DATABASE measurepower;
CREATE USER 'measurepower'@'localhost' IDENTIFIED BY 'yourpasswordhere';
GRANT ALL ON measurepower.* TO 'measurepower'@'%';
Logoff and logon again with username “measurepower” and your new password and do:
CREATE TABLE IF NOT EXISTS `watthours` (
`id` int(11) NOT NULL AUTO_INCREMENT,
`datetime` datetime NOT NULL,
`lightvalue` int(11) NOT NULL,
`unixtime` int(30) NOT NULL,
PRIMARY KEY (`id`),
KEY `id` (`id`)
) ENGINE=InnoDB  DEFAULT CHARSET=latin1 AUTO_INCREMENT=0 ;
6. We now have to change the passwords in the application so it fits the ones you’ve just made. Run this in your console:
sudo nano /home/pi/cpm/readlight
Then find this line and change the password.
con = mdb.connect(‘localhost’, ‘measurepower’, ‘yourpasswordhere’, ‘measurepower’);
Next, run this in your console:
$ sudo nano /var/www/index.php
Then find this line and change the password:
$link = mysql_connect(‘localhost’, ‘measurepower’, ‘yourpasswordhere’);
7. The last thing to do is to ensure that the logging application starts when the Raspberry Pi starts:
Run this in your console:
$ sudo nano /etc/rc.local
Then add this line as the 2nd last line:
/home/pi/cpm/./readlight &
so the line will end with exit 0
Your are done!
Go to http://<the ip address> to see the result!
If the logger saves too many or too few watt hours, you might try to adjust the light-value:
sudo nano /home/pi/cpm/readlight
Look for this line: if result>=1500:
You can read the light-value by running:
/home/pi/cpm/./debug
Credits goes to Søren @ http://www.hyggeit.dk/2013/04/super-cheap-web-enabled-power.html for the original idea.
Future ideas
- Cleanup PHP
- Make PHP more efficient/less power consuming.
- Use a more lightweight web-server.
- Move more load to user via jQuery etc.
- API to have live view and sending data to external services.
- Any ideas? Post them in the comments! Thanks 🙂